Uniform Information : American Revolution

Looking for something else in my box of ‘printed Scruby things’ I came across a few letters to/from customers. One of the commonly asked for pieces of information concerned uniform color. I came across several pieces of information, some were simple descriptions that Jack would mail back as a reply to these queries and others were found in the pages of Scruby catalogs. Today I’m posting an example of the type of information provided via various Scruby catalogs; concerning the American Revolution.

american-1775-83AMERICAN INFANTRY
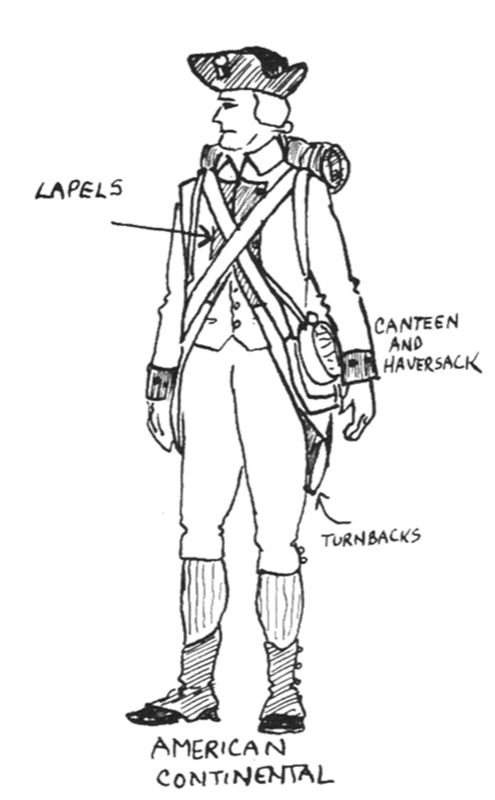
American Revolution, 1775-83

CONTINENTALS wore a brown or blue long-tailed coat, with Regimental colors on the cuffs, lapels and turnbacks. These can be Red, White, etc., since each State regiment in t~e Continental Army had its own color. Vest and Pants are either white or a buff color. Gray sox with black leggings and shoes. All belts, and the haversack (on the left hip) are white canvas, and the wooden canteen generally was red with the State name on the side (Example: N.Y . for New York). The tricorne hat is black, and often was edged with white tape.

PENNSYLVANIA RIFLEMEN wore buckskin jackets, buff pants, red knapsack, white belts, black tricorne hat, while sox, leggings and shoes were the same as the Continental. MORGAN’S RIFLES wore a distinctive brim hat, with one side turned up (black), and white buckskin jacket and pants, usually with brown shoes or moccasins. The belts were usually of brown deerskin or leather. The fringes on the buckskin clothing of both Morgan’s and the Pennsylvania Rifle Regiments were often colored red or yellow.

british-1775-83BRITISH SOLDIERS
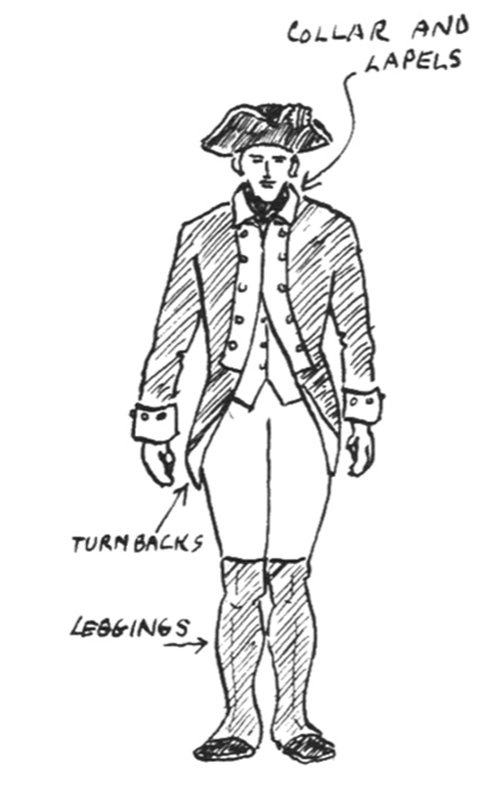
AMERICAN REVOLUTION, 1775-83

A British Regiment of this ‘period consisted of 8 companies of enlisted men called the “Battalion” companies, one company of Light Infantry (for skirmishing purposes) and one company of Grenadiers (the elite heavy assault troops). Generally the Grenadiers of various Regiments were brigaded together into one unit, as were the Light Infantry.
The BATTALION SOLDIER always wore the tricorne hat (as illustrated) while the GRENADIER wore a black bearskin with a silver plaque on front. Otherwise they wore the same uniform as the BATTALION soldier. The tricorne was black with white tape around the edge. The coat is brick red, with Regimental colors on the collar, cuffs, lapels and turnbacks. These Regimental colors can be yellow, blue, white,’ etc. depending on the particular regiment. Buttons on the coat are silver or brass. The neck cloth was black, while the vest, pants.and all belts are white. Some troops wore haversacks (on the left hip) and these generally were tan or white canvas. Leggings (which came above the knee) are black with silver buttons down the side. Shoes and cartridge box are black. Knapsacks were generally tan colored leather, with grey blanketroll on top.

Edit/Addition – 3 March 2015:
It didn’t seem fair to tease you with mention of actual letter from customers; as such, presented for your review is an example of the types of letter received by Scruby Miniatures:

example-customer-letter


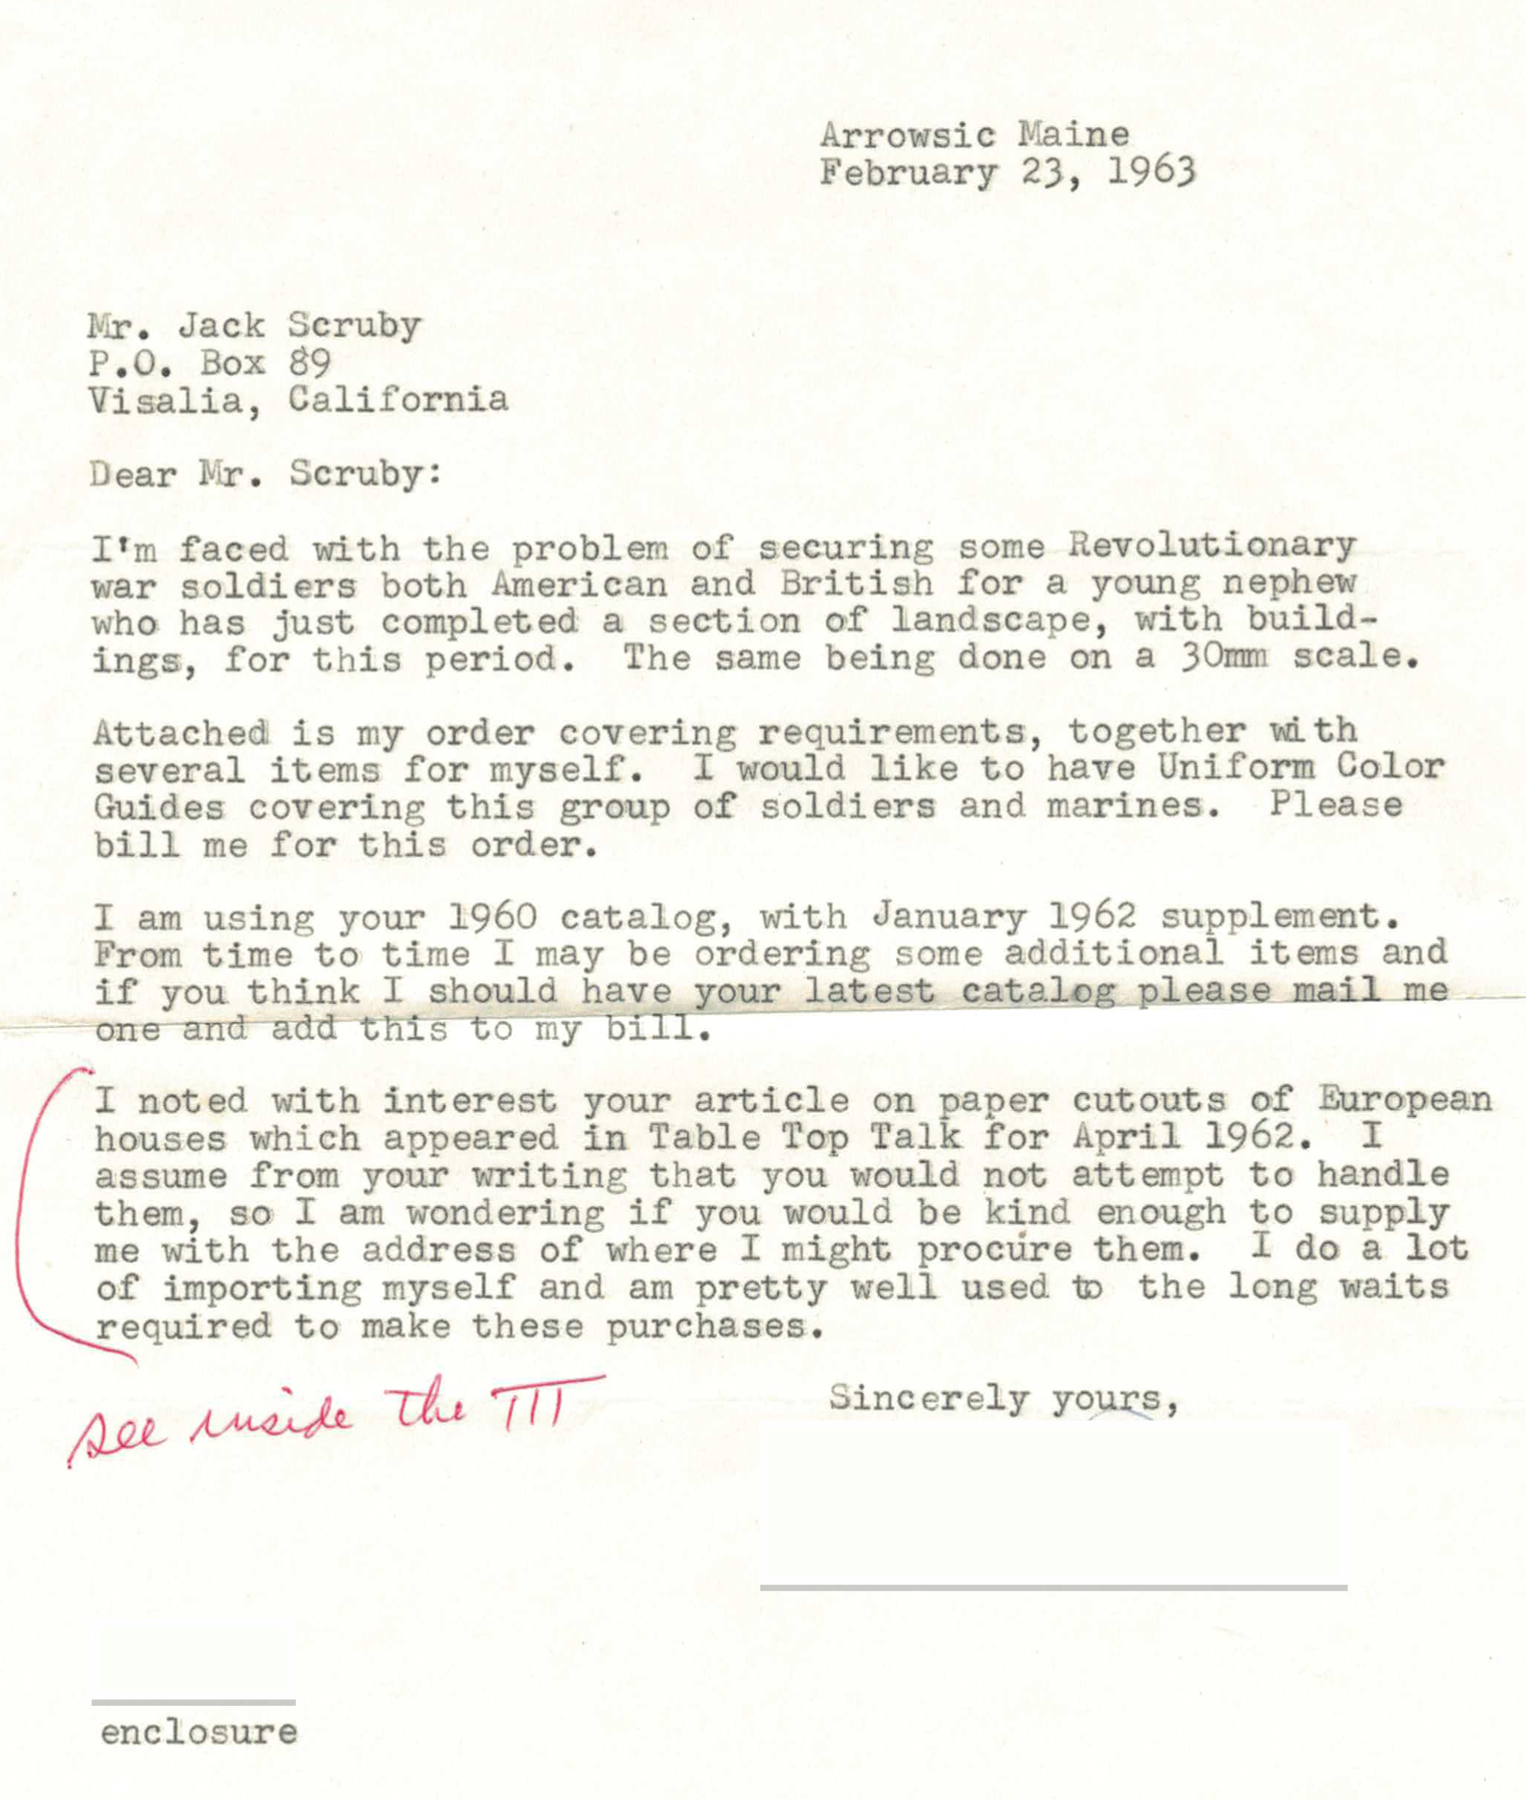
More news later this week…


Horse & Musket War Game in an Hour

We’ve been looking over and toying with the rules presented in the Neil Thomas book, One-hour Wargames.

1hour-wargames-cover

There are plenty of reviews online. Some favorable, others not – most are in agreement that the rules presented are very basic, and would be good for the causal gamer or to introduce newcomers. We like casual games and are always looking to attract new historical gamers, so we plan on playing a number of games based on the rules presented in this book.

Note: This post was originally written to be posted (automatically) on the 8th, before we had a chance to actually play any games with these rules. Saturday (7th) turned out to be a game day; so we had a chance to play with the rules before posting the article. Anyhow, many edits later we are posting, with some games under out belt – hopefully the edits haven’t introduced any confusion.

For our first games we will be trying out the Horse and Musket Wargame Rules from Chapter 11. Since we already have numerous based and painted figures we are working with what we have on hand.

For SYW we already have numerous Scruby N-Gauge figures, painted, based and ready to rumble. Our (Infantry) figures are on bases with 14 figures and a frontage of 2 1/2″. All of our bases have a frontage of 2 1/2″ – where the rules are presented in the book call for a frontage of 4″ to 6″ (Infantry & Cavalry, with Artillery frontage 2″ to 3″) with the game being played on area measuring 36″ x 36″. Our first changes shrink things to fit our based & painted figures – All unit frontages will be 2 1/2″ and the play area will be 24″ x 24″. This should work out nicely, as we can easily setup multiple games (side-by-side) on a standard (folding) banquet table; which just happens to fit the tables at the local game shop (The Labyrinth Games).

Next we need to adjust movement and firing ranges to fit our new, reduced, size play area. No real chore here, as we will simply cut distance/range by 1/3 (rounding down to stay with whole numbers).

Adjusted Movement and Range:

Move Range
Infantry 4″ 8″
Skirmishers 6″ 8″
Artillery 4″ 18″
Cavalry 9″

Our only other modification for movement is that when failing to destroy an enemy, the attacking Cavalry units will retreat 3″ after combat has been resolved.

The rules call for 15 hits to eliminate a unit. We have changed this to 10 and have added a saving throw for hits. When a unit takes hits, a roll of 1-2 will Save (one roll per hit). The Saving throw keeps both players involved and makes a nice balance.

We will be making a new game board to use as a play area. I’ve been wanting to do something with chalkboard paint, and this seems like the perfect fit. I’ll be starting with a 24″ square piece of hardboard. Painting the edges black while the top surface will be painted with green colored chalkboard paint. From there we will use colored chalk to draw out roads, rivers, forest boundaries and the like. We will still use wood blocks or foam board for hills and model trees for trees. We use 6mm buildings for most of our N-Gauge games, and I suspect that we will do the same here, perhaps with a chalked in boundary.

Now that we have a few games under our belts, I’m seeing some of the major weaknesses of the system: Artillery is too powerful (thus our shorter range, but we need further refinements for artillery). Without Infantry melee, the game quickly devolves to “stand and shoot” with little maneuver. Admittedly, our test games were light on blocking terrain, but still open fields, should still allow/cause more maneuver than were found necessary. Of course the whole idea behind these rules is a quick and easy game. They do provide that; but a good game needs more – maybe not a lot more, but something more. I think next we will try some English Civil War battles – rules are very similar – I have some 15mm figures based for this, the stands about the sizes called for in the written rules, so we shall work with play area [size] and measurements as written and see how that goes.

I’ve not given up on this small, fast playing game, but I do believe that we will need to add some more to it; but we will keep it simple, as that will be inline with my goals.

Rules Changes for Avalon Hill’s Civil War

Reproduced here is (the text of) a difficult to find and rarely seen errata card for rules updates to the Civil War game published by Avalon Hill in 1961.

IMPORTANT RULE CHANGES — CIVIL WAR

A. PREPARE FOR PLAY: Both Union and Confederate players begin with 6 Pawns each – Confederate, only, may place his pawns adjacent to the North/South border line.

B. RIVER MOVEMENT: Neither player is allowed the additional movement ALONG river lines.

C. HOW TO WIN: Confederate player wins if he: (1) Avoids the Union condition of victory, or (2) Captures any TWO Union replacement centers and retains OCCUPANCY (undisputed control NOT necessary) simultaneously for the two following consecutive months.

line

While not an accurate simulation, this game provides a nice distraction now and again and frequently finds itself on our game table.

What’s on the Game Table

For this post we will slip back in time to December of last year (2014). My oldest son, Scott, came to spend some time over the holidays. He had never been back back to Wisconsin for a visit, so this was an extra special treat. My work schedule went a bit wonky, so I was working much more than I had planned on, but we still got to spend a bit of time together.

In addition to all the usual ‘stuff’ we were able to fit in some hours of good old war gaming. It was all board games; primarily because the game table was covered with, well lots and lots of ‘stuff’. In addition to the usual Avalon Hill classics we played Ogre (Steve Jackson Games). Ogre was on the list because of the stocking stuffers I bought for Scott and Liam; each received a copy of the pocket edition of Ogre.

Ogre Pocket Edition CoverIn High School we played a lot of Ogre, with a second round of heavy play in the late 80’s. Ogre is one of the games on my must have list, and with the pocket edition selling for $2.95 it was a must have purchase for the two boys.

I still have most of the copies of Ogre that I have purchased over the years, so I broke out my punched (cut) counters and one of my maps. We just played the introductory scenario, but had a grand time.

Ogre 1st. Editon CoverSome of the other games we played include: Civil War, Kriegspiel, Nieuchess, Strike Force One and Privateer. I wanted to get to PanzerBlitz, but didn’t manage to get it dug out until after Scott returned to California.

On the game table today we have three board games: PanzerBlitz (more on this in a future post), ZombiChess (a game Scott and I are designing – a very introductory level miniature/board game hybrid; more on this as the design comes together) and Ogre. Only this time we are not talking about the original or pocket editions, nor even the later Deluxe edition. On the table sits the mega-sized Designers Edition. Our local game shop (The Labyrinth Games) originally had two copies in stock. The first sold a few months ago, leaving one copy in the store. It was a game that I looked at every time I went in to the store. I wanted it, but didn’t at the same time. The game is a bit pricey and there were always other things to spend my gaming budget on. Well I finally broke down and decided that I should own a Designer’s Edition of Ogre.

Ogre Designers Editon

I’ve always been a sucker for games with larger sized hexes; and with no signs of improving eyesight I just couldn’t resist any longer. There are plenty of reviews on the web, and Steve Jackson Games has sold out of this edition (meaning that unless you get lucky – like me – you won’t find (m)any copies at retail), so another review is not needed. Counters are punched (well, enough for ‘standard’ Ogre scenario) and the Ogre map board is laid out on the table; Liam and I will be playing a number of games over the next few weeks and I hope that this will become a regular on the game table.

Look for more concerning the design and play-testing of ZombiChess as well as a look at my current PanzerBlitz project and even a bit about a miniatures cross-over for Strike Force One. As always there is a lot more to cover, but for now I’ll draw this to a close.

Next time an update on our publications and some shop reorganization.

Painting Horses (fast)

I always struggle when it comes to painting horses. I though they were a royal paint to cast, but maybe they are just hard all the way around. Of course some of it could just be me 🙂

Well, I know for sure that horses can be a chore to paint, and it just happens that HistoriFigs friend, Jeff Hudelson, has recently posted an article on his Project ECW blog covering how he paints horses.

Project ECW

If you have an interest in a fast painting method for horses, why not pop on over and take a look at Jeff’s posting. Maybe you will find something useful for your own projects.

Posted in ISR