ORGANIZING A NAPOLEONIC WAR GAME ARMY

Today we bring you an article by Jack Scruby from the year 1959. We learn about Formation trays and a Regimental type game. I find this article interesting in that its contents closely mirrors a Napoleonic project that I have been working on for some time. Will I ever finish the project? Who knows? I am a very slow painter and in 30mm I’m even slower, so we shall see.

Also mentioned in this piece are the actual rules used to play the game. I may have a copy of these and if I do, I will post them in the near future. If you happen to have a copy, please let me know (just in case I can’t find a copy here).


ORGANIZING A NAPOLEONIC WAR GAME ARMY

by Jack Scruby

The War Game Digest Book III Volume II, June 1959

Any war gamer setting out to organize a Napoleonic war game army has several things to consider. But the basic elements should be scale and numbers. In the past few years I’ve made two complete Napoleonic armies; one in 54mm scale and one in 30mm scale; and perhaps my experience will be of some help to those of you interested in this period of miniature warfare.

Scale of the figures (i.e, their actual size) is of great importance, and one that takes careful consideration. Those players who like their figures painted as recognizable individuals will prefer the 54mm I’m sure. But the big drawback to this scale model is that they are expensive to buy or reproduce, they are bulky and hard to store, are difficult to painting quantity, and require large battlegrounds to maneuver on.

Several years ago I commenced making 30mm soldiers, and the glamor of the 54mm size figure was lost for good, and now my Napoleonic army in this scale that I spent a couple of years in the making, lies idly on my shelves gathering dust and cobwebs.

For I’ve found the 30mm scale is not too small, nor too large; its easily stored between battles, the figures are painted quickly, and enough “individualism” remains to satisfy my needs. Unlike our friend Ed Saunders, who is now specializing in soldiers that stand only 5/8 of an inch high, I’ll still stick to the 30mm figure, since no matter how small the figure, or how great the playing area, a miniature battle generally is fought on a small part of the playing field as each general is forced to concentrate his troops against his opponents concentrations.

The number of troops needed for Napoleonic war games can be decided by the area of playing space available, the amount of money available to buy soldiers with, and the time generally available to play the war game in. These factors should be combined, for upon each of them depends the number of troops one should have to fit his own particular needs and physical war game setup. Perhaps by telling you of my own war game armies, it will give you a “scale” to compare your own plans and ideas.

At the present time my 30mm Napoleonic armies consist of some 400 French and 400 British infantry figures, and l00 each of cavalry. I seldom use these many men to fight a war game with, but I have used this number in some games and did not find my 8 ft by 6 ft sand table too crowded.

Normally my opponent and I used armies composed of 260 infantrymen, 3 cannons and 50 cavalry (or less). To me this is about the right numbers — any less and its only a skirmish, any more and its crowded. Using this many men, battles normally will last from 5 to 7 hours duration.

Within recent months however, we’ve developed a new type of Napoleonic war game, based on ideas presented to us by John Schuster and Ted Haskell – We call this the Regimental Napoleonic war game, and in using these rules, organization of your troops is of prime importance.

Basically, under these rules, all infantry is formed into ‘Regiments’ of 20-men, and are mounted on a balsa wood moving tray (also called Formation Tray). All fighting is done on a ‘regimental’ basis; i.e. volleys are fired by a regiment, not by an individual count of men. When casualties within a regiment reach 3/4 of the original strength, that regiment is removed from the table. Up to that time, the regiment retains its full firepower.

Since we have been using these Formation Trays, we have found that more troops could be used, and moved, than possible in our previous battles. For naturally, it is as quick to move a tray containing 20 soldiers as it once was to move a single model soldier. Cutting down on the “movement time” has speeded up the game tremendously – once it would take at least fifteen minutes to move your entire force; now its only a few minutes.

Now, provided that you would use these Moving Trays, organization of your armies then basically depend on the number of Regiments. (One officer is usually added to each regiment, but is not counted in the volley – his biggest asset is that he counts as 2 points in a melee). Thus, if you decided to have lO man regiments per moving tray, you could easily have lO regiments – or – lOO men per side. In proportion you’d need 25 cavalry and one or two cannons. As you decide, you can then build up your armies further by adding more regiments, or by adding more men to your present regiments. Thus, in the end, your two opposing forces will balance out nicely.

As you get further into the war game, you’ll want some variance from having two equal forces always oppose each other. Some regiments can be “reinforced regiments”, and can have, say, l5 men instead of the basic lO men (as outlined above). Some can be Light Infantry regiments, or Guard regiments with more movement or firepower. And the Regimental Rules allow for more – or less -firepower depending on the formation (In Line, Column, or Square) the regiment happens to be in at the time of delivering the volley. So there are many ways to “relieve the organizational monotony” of a basic infantry regiment mounted on a moving tray.

Cavalry, artillery and gun crews, are not mounted on trays, but are moved as individuals. Often too, when individual regiments are cut down by casualties, we “dismount” the figures from the trays and move them (in formation) individually until the Regiment is depleted and removed from the table. But, taking an army as I outlined that we use — 260 infantry, 50 cavalry, 3 guns – each player on any given move has only 13 formation trays to move, 5O cavalry and the 3 guns and crews – a matter of only a few minutes time! Our average war game has been cut down at least two hours just by the introduction of these moving trays.

One thing too I like about these trays (aside from their “organizational value”) is the fact that between battles, the 30mm troops really look sharp when set up on their storage shelves. We generally place the casualties back on the trays whenever a regiment is removed from the table and when you set it upon your shelf it makes a nice showpiece to show your friends.

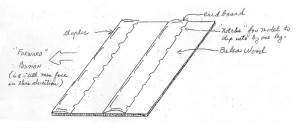
These Formation trays are quite simple to make. I use pieces of 3 inch by 1/4 inch balsa wood, cut to-the appropriate length. Since I mount a 2O man regiment in two rows (lO men to a row) this is generally about 7 inches long by 3 inches wide . When the tray is moved into Line Formation, the lO men face forward. In Column formation, it forms two lines of marching men. (They naturally are not moved on the tray – only – the tray is moved to denote whether in Line or Column. When a “SQUARE ” is formed, we merely place a card on the tray, thus denoting that this tray is formed in Square)

In order to hold the figures onto the-tray, there are two simple ways of doing it. If you use the floor or a hard table top to fight on, you need merely coat the balsa wood tray with a thin layer of childs clay. The soldiers stick fine to this, and are easily removed. You don’t need to even color the tray if you use the vari-colored clays usually sold in a box.

If you play on a sand table like T do, the clay of course cannot be used. It is simple however to make the tray by merely cutting out strips of cardboard, notching tMorhem to fit the leg of the soldier, and stapling these cardboards to the balsa wood. Spray the tray brown, green or gray, and you‘re in business. You’ll find that even on the steepest terrain (on a dirt table) the soldiers will stay inside the formation tray without too much

toppling over.

Formation Tray

Formation Tray

Thanks to John Schuster – who took the time to stencil out the Regimental Rules — a limited number of copies of these rules are available, Those readers who have not already received them from me, should write, and I‘ll send them the rules – as long as they last.

Whether this idea of Moving Trays can be worked for other types of Musket Period war games – such as the Civil War, American Revolution, etc. – I cant say. For the Napoleonic games, where Regiments fought shoulder to shoulder, it brings an added realism that is not possible any other way, it also eliminates the players from using “modern” tactics of straggling and well spread out lines, and forces them to fight the battles as they were fought in that day and age.

Thus, you’ll find the Moving Tray type of game makes for much easier organization of armies, cuts down the playing time, allows more~troops to be used, relieves the dullness of fighting a slow moving opponent, and in general adds to the overall appearance of the battlefield of Napoleonic war games.

More soon…
Waggon Train – A Tactical Problem

It has been quite a while since we last presented a Tactical Problem for your enjoyment. As luck would have it, the September 1961 issue of The War Game Digest contains a Tactical Problem presented by non other than Charles Grant.

Wagon or Supply train escort can make for a very fun and challenging war game scenario. The problem as posed by Mr. Grant should provide a fun game. In fact, one of our next games at HistoriFigs HQ will use today’s Tactical Problem as the basis for our scenario. Well, alight then, enough waiting already, lets get on with the show…


WAGGON TRAIN
A Tactical Problem

By Charles Grant
The War Game Digest, Book V Volume III, September 1961


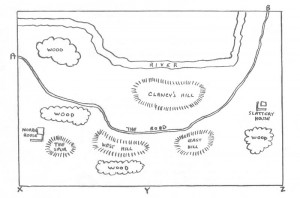
This is a scheme which, if it works out at all well, should afford the players a fair amount of fun and possibly cause them to improvise more than in a set piece type of battle. It involves the movement of a convoy (supplies, ammo., or what you will) between points ‘A‘ and ‘B’ on the map, one player having the side moving the convoy, the other’s problem being, naturally, to intercept it.


Waggon Train

Waggon Train - A Tactical Problem. Click to Enlarge

The troops engaged are as follows: Reader (who has the waggon train) deploys three brigades of infantry, each of 50 men; the Enemy (the intercepting force) has one brigade of infantry, again of 50 men, and one brigade of cavalry, of 30 men. No guns on either side, for a change.

The procedure is – on Move No. 1 the wagon train with an escort of two brigades of Infantry arrive at ‘A’. At the same time, the enemy player throws a die four times. The first throw determines the point on the table where his infantry brigade debouches (throws 1, 2 = ‘X’; 3, 4 = ‘Y’, and 5, 6: ‘Z’) and the second throw the moves on which it appears. For example, throws of 4 and 5 indicate that the brigade would appear at ‘Y’ on the 5th move. The second pair of throws determines place and time of arrival of the cavalry brigade.

Finally, the Reader throws two dice — to show when his third infantry brigade appears at ’B’, coming to meet the waggons. If the Reader is lucky it might appear on the 2nd move, but it might even be the 12th!

There it is — the problem being to bring the waggons to their destination in the teeth of opposition. Junior (with the waggons) and I fought the game some time ago and he was just able to get his train home in the teeth of baffled Confederate cavalry, but not before some exceedingly brisk fighting had taken place along the route. The train we represented, by the way, with a couple of four—horse white—tops.

By the way, both horse and foot can move all over the place, of course, but the waggcns must stay on the highway.


Look for more Tactical Problems and HistoriFigs news in the near future.


Flat Terrain

Time for another installment of The Morchauser Files


FLAT TERRAIN

by
Joe Morschauser

The War Game Digest, Book V Volume III, September 1961

Have you developed an over-stuffed war game table? Are all those little houses, trees, rocks etc. getting in the way of your battle? Sure, you have spent hours and hours building that little house! Sure, you have spent days and days constructing that clump of forest! But can you move? Aren’t your soldiers accessory-bound? Don’t you find it tough to make that dashing flank attack? Naturally you do! And its time you realised that your accessories have taken over your battleground. However, be of good hearth There’s something you can do about it… something which does not involve the rental of a warehouse to fight your war games in.

For several hundred years European war gamers have used little “flat” soldiers. (Don’t say “UGH” you ’round’ men… read on.) Now “flatters” may insist the main reason for their sticking to “flats” is the wide nange of types available, the cost, the weight or a dozen other excusese I know different. The real reason “flatters” stick to “flats” is that they take a fraction of the space occupied by a round of any type.

I have no particular desire to convert you to flats. I myself in my own war gaming use mainly the old—fashioned 54mm round. For a big battle I need a big table which I fortunately have, but even on a big table I found that accessories have been gradually pushing me off. As a result I have done the only sensible thing — I am converting my terrain accessories to “flats”.

These “flat” accessories are strips of cardboard, plyboard etc. cut to the desired.shape. On my table I use the grid system of 4 inch x 4 inch squares. Any “round” house eight inches long would occupy two valuable squares. But the “flat” house is placed along the grid line between the squares thus leaving these squares open for movement of troops. This uses no space at all but gives the desired effect.

You may question how such “flat” houses look when viewed from the end. my answer is “quite good” for after some experiments I have designed my houses in an L-shape. This means that though the house still rests on its narrow edge along the grid lines, its L·shape keeps it upright without any base. At the same time it also means that one can view the house either from the side or end of the table and still get the effect of a solid object.

The best material for “flat” accessories is quite naturally thin plyboard or composition board. But heavy cardboard will do quite nicely. If possible the L—shaped design should be used but if this is just not possible for some reason you can slot a cross-piece of board at either end to provide a solid base. The whole of course should be fastened down to the table with tape, staples or tacks when in use.

Even those completely lacking in artistic talent should have no trouble in designing a house, some trees or a whole forest, low stone walls or groups of rocks. If your imagination is dry at this moment, go to a picture magazine. They are loaded with shots of just the sort of thing you can trace and transfer to your board. Your tools are simple of course, consisting of tape, board, a sharp knife for cutting out your accessory, a pencil and some poster paints for finishing touches. If you wish to get quite fancy you can cut out windows in houses, substituting coloured celophane for glass. Or maybe you wish to leave them open for snipers to shoot through.

You can even make hills or mountains of the “flat” type. In the case of impassable hills or mountains there is no problem. But if you wish to make passable hills you should mark off moves up in the form of lines. Actually troops will never move “up” for this will be impossible. what you do is to draw your move lines on the hills in such a way as to indicate on what turn after the troops reach the base of the hill they are where. Thus, one unit reaching base of hill on turn five, say, gets to the top of the hill on turn seven. Enemy on other side reached base on turn six and is below turn five troops by one move line. Or if you want to get really fancy and make your hills or mountains of plyboard you can put steps of board sticking out on each side of the hill like shelves for troops to actually climb. In this case though you must be sure your mountain has a secure cross base and that this is securely fastened down to the table. (Shelf—steps are of course actually directly above each other not stepped out as in normal war—game hills) I might add here that there’s little to stop you from making a two or three foot high hill with such shelves. So long as you can reach the shelves in comfort your ”flat” mountain or hill can be as high as you like and still take up no more space than a half-inch high wall or fence.

The same type of shelf—steps may be used if one is building a castle wall. The platform on top of the wall can be directly above an area below which is free for troop use. Towers might have several shelf levels and still have open space at their base for movement of men on the table itself. I think I need to go no further with this for I’m sure your imagination is working like mad already…..or you are laughing your head off! But if you are laughing, remember, you may be doing it out of the other side of your face when your war gate table gets so crowded you can’t move troops.

The “flat” technique of terrain and terrain accessories leaves a lot to be desired. It has its limitations to be sure. Those who like pure realism won’t care for it at all. But remember, you scoffers, you can get so real with a war game table you can‘t play war games on it. You won’t be able to fight an “open” battle because there isn‘t room enough. All you will have is a beautiful diorama. And you don’t need a diorama, no matter how beautiful. You need SPACE and “flat” terrain can give it to you like nothing else.

Now lets see, where did those soldiers fall when that mountain turned over??? …

—–

It has been far too long since our last post of an article by Joe Morschauser. Since I still have several in hand, I thought this one would make a nice break from my recent batch of articles by Tony Bath.

As for Flat Terrain. I have played many a game where the houses, fences, rock walls and the like have been just the type Mr. Morschauser writes about. While I have none of these in my collection of terrain, I may well revisit the idea for my next batch of house, and rock walls. Can’t say that I’ve ever used this type of hill, but I can at least picture how these might work out. We do hope you enjoyed this posting. Look for more soon.


Chessboard War

Time for the next installment of the Tony Bath Compendium

CHESSBOARD WAR

by
 Tony Bath
The War Game Digest Book V Volume III, September 1961

Battleground: a sheet of board 3′ x 3′ divided up into 2″ squares.

Initial layout: each player sets out his army on his own side of the board. Any lay-out may be used, but his front line may not be more than 7 squares forward from the base—line.

Moves: The players toss for first move, and then move alternately. At each move one piece may be moved — infantry 1 square, cavalry 2 squares. Moves may be made in any direction, forwards, backwards, sideways or diagonally, but cavalry must move 2 squares and in a straight line. Two pieces may not occupy the same square, but cavalry may jump over a square occupied by one of their own pieces. They cannot jump over opposing pieces.

Combat: Individual combat results when one player moves a piece into a square already occupied by an enemy soldier. The attacking player then throws 2 dice. In equal combat (i.e. infantry v infantry or cavalry v cavalry) he must throw a six to kill the opposing piece; if a horseman attacks a foot soldier he kills him with a throw of 4 or higher. If the required number is not thrown, the defending player then throws: if he can beat the other’s throw then the attacking soldier is slain, but if he fails to beat it he must retire his piece one move. If no square is open for this retirement the man is captured. All dead or captured pieces are removed from the board. A soldier who has slain his opponent in hand to hand may make an additional move.

Missile Weapons: Any troops possessing missile weapons i.e. bows, slings etc. may fire upon any enemy within 2 squares range. At the commencement of each move the player must indicate which pieces are firing and nominate the soldiers they are firing at. He then throws a dice for each man, a six being needed to kill.

Object of the game: to kill the enemy king and capture his base. The base is the middle square of the base line, and should be indicated by a different colour. Here the King takes his stand: he may not leave this square. To kill him and capture the base the attacker must move a piece into contact, and then throw a 6; failure to throw a 6 means death to the attacker. The King cannot be harmed by missile fire.

Additional Rule: in addition to his King, each player may appoint a General, and indicate him to his opponent. If a player’s General is killed, he loses 4 moves.

The first try—outs of this scheme were most illuminating. For these experiments I used forces comprising 29 horse and 50 foot apiece, in addition to the King. Further, 15 of the infantry on either side were archers. In the initial layout King Arthur’s army spread its bowmen along the front in a thin outpost line, with a two—deep block of spearmen.in the centre. The cavalry were in two equal columns on the wings, with a few in reserve in the centre. The main body of infantry was drawn up in column in the left centre, with the remainder in reserve on the base line.

King Modred used a different formation. His main cavalry force, 24 strong, was massed in column on his right, with the remaining horsemen scattered about in the centre. The bulk of his infantry were deployed in 3 lines in the centre, and the right was held by about half his archers backed by a few spearmen. The rest of the archers formed a ring around the King himself.

Arthur’s plan was to hold his centre back and drive both his cavalry wings deep into the enemy line and pinch out his centre; Modred’s was also to hold back his centre, but also to remain on the defensive on his left, and blitz his main cavalry force straight through to the enemy base line. In actual fact neither plan got very far.

Modred won the toss and opened the attack by advancing his cavalry as planned: Arthur promptly countered by bringing forward his left-wing cavalry. In the course of this move one of his knights, much to his astonishment broke right through Modred’s centre, cut down one of the archers of the guard, and challenged Modred himself, but was slain. The battle then developed very swiftly as Modred completely switched his plan of attack. While his main cavalry division engaged Arthur’s left wing cavalry in an indecisive combat, and while Arthur’s right wing cavalry got itself entangled with the archers on Modred’s left, a series of one man cavalry raids were launched from Modred’s right centre. Easily cutting through or by-passing the spearmen in Arthur’s centre, these knights broke down the ring of infantry around the king and challenged him one after the other. Attempts by Arthur’s cavalry to intervene proved abortive, and though 7 knights fell before Arthur*s sword, at last he went down under the lances, and Modred gained a complete victory.

Several lessons were learnt from this little action. Firstly that the rule by which cavalry must move their full 2 squares in a straight line (i.e. a cavalryman cannot attack an opponent who is only l square away) means that the attacking player must handle his pieces with great care, otherwise his cavalry may easily bog down and be unable to move. On two occasions a Modred knight burst through Arthur’s outer defences easily enough but was immobilised because he could not reach a position exactly 2 squares from the inner defensive ring.

Secondly, that cavalry is the decisive arm, and that infantry should be largely used as blocking pieces to hamper the movement of enemy cavalry. Once attacked by an enemy horsemen, the odds are completely against the infantryman who will be slain 9 times out of 10. The best defence for the King would appear to be a guard of archers — Modred’s archer guard was only pierced once in four attacks.

Thirdly, that the attacking piece in equal combat is at a slight dis—advantage since it must obtain a six to dispose of its opponent. Therefore, although the whole object of the game is to drive an attack home to the enemy base, if the enemy can be drawn into the actual attack move preceding combat, so much the better.

I then tried a second game, with slightly reduced forces but using exactly the same methods. Again Modred easily pierced Arthur’s position and, at some cost, slew him: thus confirming the lessons of the first game. A third game was then initiated, with Modred using the same tactics but Arthur altering his. This time Modred’s attacks were held by a combination of archers spearmen and a few cavalry, while Arthur built up an assault on Modred’s left, this time mixing his cavalry with archers. In this way, every time the cavalry were blocked by infantry or archers whom they could not get into position to attack, Arthur brought up his own archers and blasted a way through, giving his cavalry freedom of movement once more. By this method Modred’s archer guard was at last pierced and the King slain.

I should have mentioned that in the second game I used the optional rule of having a General in addition to a King. Carelessness by Arthur contributed largely to his defeat, because quite early in the game a Modred knight was allowed to reach a position from which he attacked and slew Arthur’s general. The 4 moves thus gained proved decisive.

NOTE: I devised this little game a couple of years ago when in the early stages of war gaming. It is not intended as a serious alternative to the regular war game, though it doubtless could be expanded in various ways. However, as a means of passing half an hour or so with something to do with war games I think it serves its purpose.

We do hope you are enjoying our postings of WGD articles by Tony Bath; there are a few more in an ‘almost ready’ state, so be sure to look for the next chapter of our Tony Batch Compendium. As well as news concerning HistoriFigs.

Fact or Fancy?

Once again, I was looking for something else when I stumbled upon another interesting article by Tony Bath. With the other pieces I have in the pipeline, it looks like you may be stuck with a few more posts concerning the work and war gaming of Tony Bath. For those of you into Imaginations this article should be a treat. For those of a pure historical bent, well this is still a good article. So without further delay, the next post for the Tony Bath Compendium

FACT OR FANCY?

by Tony Bath

The War Game Digest, Book V Volume III, September 1961

In my experience war gamers fall into two fairly distinct categories: those who base their games on fact — i.e. the American Civil war, the Napoleonic Period, the Franco-Prussian war etc. – and those who dream up their own kingdoms, continents etc. and people them as they see fit. Naturally not everyone falls distinctly one side or the other of this line: some of us who prefer fancy to fact do not go as far as others.

However again it has been my experience that those of you who faithfully reproduce the armies of South and North, France, Prussia, Austria and the rest tend to be a little patronizing towards those of us who produce our own countries. You point to the immense amount of research you do to ensure that your uniforms are correct down to the last button and flash, to the absolutely correct organisation of your miniature armies, and tell us how easy it is for us, who don’t have to conform to realism.

Have you ever stopped to think just how much work in fact goes into the creation of a mythical kingdom or continent? Unlike you fact-lovers who only have to refer to reference books, prints, postcards etc for all your details, every single point whether it is composition of an army, uniform colouring, number of troops — even maps of the country – have to come from our imaginations. So you see, it is in fact the creator of a mythical empire who probably works harder at his task than the pure fact general.

But to the war gamer who prefers a mythical set-up, all this work is part of the fun. Lets just take a look at how he goes about setting up his own empire.

First of all comes the creation of the area itself. Here if your own fertile imagination fails you, you can turn to a number of authors who have obligingly already created ready-made empires in their novels. In the books of Robert Howard I found the mythical Hyborian Age which formed a wonderful basis for war gaming; in “Lord of the Rings” by Tolkien I came across a second equally perfect land which I dubbed Tolkia. A story in a pulp magazine by Sprague de Camp formed the basis on which Roy Blackman based his land of Heskeronis. Edgar Rice Burroughs offers fertile field, both in several of his Tarzan stories which offer hidden lands in the depths of Africa, and better still in his stories of the kin doms of Mars and Venus. Or you can turn to the old legends of earth itself and reconstruct the lost kingdom of Atlantis or the lands of Lemuria.

Having established your country, you next need a map of it in considerable detail. Here I was lucky in that both Howard and Tolkien included in their books maps of the area covered. True Howard’s didn’t show any great detail, but it gave the shape of the different countries. Blown up into a size some 6′ x 4’, these maps gave me the bare bones of my continents. with the other lands I have briefly mentioned, it has been a case of constructing suitable maps from the details mentioned in the books.

I now had my map of Hyboria in outline divided into over twenty different—countries. In the·books I learned a few details of some of these, mentions of their cities, rulers and characteristics. The rest I had to provide myself, so I set about founding cities, creating kings and princes, dividing the kingdoms into provinces, marking in mountains, roads, rivers etc. Slowly my continent was taking shape.

I now had a reasonably detailed map, and I had created a nobility, linking it together in many cases by marriages – oh yes I had to create princesses as well as princes – and the next step was to have some means of deciding on the size of the armies involved and their characteristics. My map was divided into half-inch squares, each representing an area 5 miles square; so I decided that each square not covered by mountains would – yield a revenue of so much per year. By counting the number of such squares in each country, I arrived at a total figure; in addition to this I established mines for gold, silver etc. in various areas and assessed their revenue, gave focal cities additional revenue for trading tolls stepped up the revenue of particularly fruitful areas, seaports etc.

Next I worked out a system by which certain proportions of the revenue involved went to certain people: the lord of a demesne kept so much, the count of the province had his share the duke took so much from his duchy, and all contributed to the royal coffers. The king in turn paid certain sums to people like the High Constable, Lord warden of the Marches etc. Having then decided on the cost of the upkeep of various troop units · light and heavy cavalry, light and heavy infantry elephants etc — I could decide just how many troops each kingdom, duchy or province could support.

Type of troops involved – whether mediaeval, Greek, Roman, Persian, Saracen etc. – came next. Accordingly I divided my continent up, the western countries getting mediaevals the south Egyptians, Persians, Aztecs etc., the extreme north Vikings and Saxons, the central areas Greeks and Romans, the east Saracens, Goths and Celts. I worked out exactly how many troops I needed and set about making them.

Now came another problem, uniform colours. There must be a ready way of distinguishing the troops of say Aquilonia from those of, for example, Hyrkania — for while I might easily know the difference, other people using my troops probably wouldn’t. So I set to work to map out a system of colour grading by which no country would uniform its troops in the same colours as another. To each country I gave a two-tone uniform — Aquilonians for instance wear black and gold, Hyrkanians blue and silver -and then using this as a base worked out variations for the provinces within a country. So that while the pikemen of the province of Gunderland wear Aquilonian black and gold, their accoutrements are red and their shields bear the Gunderland crest.

All this has taken weeks and indeed months of careful planning — and I’ve enjoyed every moment of it. Indeed, I’ve gone much further than this, purely for my own pleasure, by working out systems whereby my nobles can inter—marry, revolt against their rulers, assassinate one another, die from natural causes, and many other items. In Tolkia I have in addition a College of Wizards who can affect the situation by their use of the Black Arts, and beyond the normal weapons of war my rulers there can call on such fearsome beasts as pteranodons (winged reptiles), tyrannosaurus and dinosaurs to do their bidding. (Sometimes of course they do their own bidding with disastrous results to their masters!)

As I said in the beginning, there is no need to go this far if you do not wish – you can dream up your mythical country without all the trimmings that I and some others have applied.
The beauty of a mythical land is that your own tastes and fancies are the only rules — you create what you like how you like.

Don’t think that I am against those of you who prefer factual empires — everyone to their own taste, and as long as we enjoy ourselves in our own way then our hobby has justified itself. But I hope the foregoing may have convinced some of you that we myth-lovers put in as much work in our own way as you do!


Lots more where this came from. As well as news of ongoing projects and new releases. Check back soon, for more.